There are four distinct qualities that should be avoided like the plague. Be always aware of yourself and make sure you are not developing them; but also be wary of other drill people who show them.
Here are the three characteristics:
1. The Armchair Instructor
2. The "I've seen it all" Instructor
3. The "My way or the highway" Guy
4. The Self-appointed Expert
5. The "I was in the (Marines, Air Force, Navy, Army, Coast Guard, etc)"
I'd like to address each and explain what exactly it is and how it is dangerous.
The Armchair Instructor: This is the guy who is so good, he doesn't have to drill anymore. He's the guy who will stand there all day long and tell you how to do it right or that you are doing it wrong while demonstrating little to nothing. He has taken drill to an intellectual pursuit and is more concerned with the right way of doing things and is eager to point out what is being done wrong.
Firstly, drill is a physically engaging skill. You cannot take drill to an intellectual discipline any more than you can take playing the piano. The main damage comes from the attitude and example shown to Pathfinders. This person is more concerned with rules than the spirit of drill. They will tell a Pathfinder what he/she is doing wrong all day, but only rarely commend or encourage.
There are two ways to help perfect a person. Just like there are two ways to sculpt clay. One way is to carve away the pieces you don't want and the other is to add the things you do want. In sculpting, it really makes no difference which one you use. But in Pathfindering, it makes all the difference in the world. You cannot just carve out the undesirable parts of a Pathfinder. You cannot simply tell them all they things they are doing wrong. You must build up. (Yes, you will have to carve out a little from time to time but that is not your primary forming process) The armchair instructor will leave a group of Pathfinders feeling as though they didn't try hard enough, or that they are unskilled, or that they are simply failures. I've witnessed it with my own eyes. In a matter of minutes, excited Pathfinders with their heads held high, eager to show what they have spent hours and months preparing for, confident in what they are doing; go to dejected, heads bowed, discouraged, and defeated children. It is a travesty.
The "I've seen it all" Instructor: These people are the ones who think they've been doing it so long that they know every answer and could not possibly learn anything new. I think the concept is as ridiculous as a musician thinking they'd learned all the songs or a chef thinking they've cooked all the dishes. We know drill is such a diverse discipline that to think there is nothing left in the unknown is laughable.
These folks are a detriment because they will not work to further Pathfinder Drill and Ceremonies. They kill creativity in Pathfinders and they will belittle the contributions of others.
The "My way or the highway" Guy: This guy does it one way: His way. You will need nothing short of divine intervention to change his/her mind. These people are so stuck in the sand, they won't even admit when they are wrong (and many times they are). They learned one thing and that's they way they are going to do it till the day they die. They may justify it by just saying that's how they learned it (as if their instructor couldn't have been flawed), or that's how they've always done it (as if tradition makes it right), or that they are such superior instructors no one can question them (egomaniac anyone?).
These people are just hard to work with and have no business passing those characteristics to Pathfinders. They will lord over their domain and crush any original idea presented to them. They damage Pathfinder Drill because they pass along incorrect methods and rules. They teach Pathfinders that life is to be lived to a certain framework and that there is no deviation from what they are told. There is no room for creativity or consideration of other ideas.
The Self-appointed Expert: These people are just that: They have decided they are the expert on a particular subject and know best. They will often interject their opinions, ideas, or actions where they are not needed or requested. This is often characterized by an almost non-existent education in the subject. Many of their answers about where they came up with the idea seem to stem from some form of "I just decided to do it that way." They will often appear on the fringe of the discipline. This is the exaggerated ego at its finest.
These people are detrimental to Pathfinder drill because they are at face value obnoxious. They create resentment when they try to buffalo others. They are going beyond creative to the "let's just make stuff up" area. We should not encourage Pathfinders to do whatever comes to mind without evaluation of the proper knowledge base to do so.
The "I was in the (Marines, Air Force, Navy, Army, Coast Guard, etc)": Lets get one thing straight: I respect and commend anyone who has served in the Armed Forces. However, just like many other things, experiences can go to peoples' heads. These are the people who are constantly telling how it was done in the military and typically gripe about other aspects of Pathfinder life that do not conform to the military lifestyle. The ironic thing is that these people typically have no regular expertise beyond what was taught in basic training. These are not former drill instructors, TIs, Drill Sgts, etc. They are not former honor guard members, or military instructors of any kind that could give credence to their fit to offer opinions on drill.
These people run with very rigid and inflexible clubs. They sometimes take things way too seriously and confuse strictness with high expectations. They will obsess over insignificant details at the wrong time. They limit Pathfinders to their own expertise (which is typically limited) and will sour others on Drill. While there is great potential for people with military background to excel at Drill, some need to confront their own ego and self-importance first.
To conclude: Be wary of these characteristics in yourself and others. Take care that you do not fall into these easy characteristics. Shield yourself and your Pathfinders as best you can when encountering these people. I have seen my fair share of examples of these types of people damaging Pathfinders.... discouraging them, making them feel dumb, making them feel like failures, or belittling their accomplishments. When it ends in tears, it's not appropriate.
In step with Christ.
Tuesday, March 24, 2015
Drill and Cooking
Drill Instructors should represent a wide range of diversity. Every instructor should have their own special brand of drill. It's what makes the area in Pathfinders such a rich experience. While there are some pretty basic rules that are hard to bend, the rest is up to the instructor. Hopefully, he/she will refine the best practices and combine them with their personal style and character to be unique.
Think of it like cooking: There are foundations that apply across the board. Things like how baking works, the process of baking bread doesn't change much from baker to baker. It will always take water at 212 degrees F to boil. Now, think about cuisine.... it's as varied as there are people in the world. From country to country, region to region, each has a different way of applying the cooking techniques to achieve the flavor and dish they like. It's not like there's undiscovered types of vegetables arriving at the store every day. Most of us cook with the pretty standard items found at the grocery store.
Drill should be no different. Each instructor should have a similar foundation in the basics. The things that will not change and should not change. These are things like uniform standards, the position of attention, etc. Beyond that, I believe each instructor should strive to create their own "flavor" of drill. Most effective drill instructors will develop it automatically by putting their heart, soul, and character into their lessons. Two types of drill can be very different but still be excellent.
This diversity is what can make Pathfinder drill so special. It's the fact that each person should cause to add just a little more variation to the pot. In the end, we show up with not just one dish prepared by a hundred different people but a hundred different dishes influenced by the entire spectrum of styles.
Strive to form the way you drill. Add the elements of who you are to the way you drill and teach drill. Always make sure it's efficient and effective, but experiment and refine. Your impact can be tremendous if you know who you are and how you drill and are not afraid to show it. Let's all be Drill "chefs" - sampling each others cuisine, appreciating it for what it is, and learning from one another.
And, as always: In step with Christ.
Wednesday, February 18, 2015
Drill Master Vs. Drill Instructor
What is the difference? Is there a difference?
I tend to use the term "Drill Instructor" in my designation of a person who teaches drill to Pathfinders and staff while some older conventions would use "Drill Master". They could be one in the same and I suspect are often taken as such; however, I make a sepcial distinction between the two for clarity sake.
I use the instructor variant because it best implies the work they will be doing: instructing. They are teaching and passing on knowledge. "Master" refers to a position or a level of expertise.... this becomes quite baffling when clubs "promote" staff into the mastery position.
I still use the drill master term but in a different context. I use it in the sense someone would refer to a master of ceremonies. Usually it is a person with a particular expertise or experience to oversee something. In this case, it's drill. The position should be a Conference level position that is responsible for the conduct of drill and ceremonies in the area. They would set rules and conference convention, oversee drill competitions and their SOP, and ensure the spirit of drill and Pathfindering continues. Some would call it an administrative position.
While the two terms are closely related, they are different things in my book. Staff should be distinctly proud of being called a Drill Instructor because it represents a great deal of training, learning, and experience.
PS: I also use the term "people who teach drill" to refer to the idiots who damage Pathfinders because they "teach" inappropriately. They are the people who sour Pathfinders and staff on drill for whatever reason and by whatever process. They do not deserve a title and little more recognition than is needed to serve as a warning for others and another sad story of potential squandered.
Wednesday, February 11, 2015
Tell the Story
There are three things that should go hand in hand for a well rounded staff member. Or rather to say, three titles, or roles, that describe them. These are: Leader, Mentor, and Teacher. Each one rolls seamlessly into the other while maintaining a distinct difference. Leaders are often mentors. Teachers are a de facto leader of their class. Mentors are involved with teaching something in some way.
In the higher levels of Pathfinder Education, instructors are faced with the challenge of teaching abstract ideas in a way that can be remembered. I have sat though many a class where the instructor might as have been reading from the dictionary. There was a lot of information and concept, but very little learning. We must be constantly vigilant against falling into these easy traps (I have done it).
Here is a key: Stories. Even better if they are your own. Use them as parables. Ever wonder why Jesus used the technique to teach somewhat abstract concepts that are hard to explain without examples? It's because stories give gravity to the concepts they convey. Stories create more than just an audio presentation. They become real and physical. Confucius said: "Tell me and I will forget. Show me and I will remember, Let me do and I understand." Maybe we cannot always get to that point of understanding..... that comes with experience. But we can always at least get to the showing part. Stories do not simply tell something; they show it too. Listeners will form the mental picture, recreate the emotions, feel the sensations and will remember.
Here is the trick: Making a story effectively convey all those elements to make a story come to life in another person's mind. How do you do that? I can't tell you. Each of us is unique in our experience. Read a few good books, listen to a few good storytellers (audio books are great for this). Pick out the devices that make you want to keep listening, learn them, and apply them to your stories.
We all remember that person who could sit with your pathfinder club around a campfire and, somehow mystically, enthrall everyone with story after story about wild adventures, comedic happenings, or heavy moments. Want to be like them? There's nothing stopping you.
Tuesday, December 2, 2014
A Squared Away Uniform
Drill Instructors, above all other staff, must represent the definition of uniform perfection at all times. That being said, it can be very difficult to get that "look" down. This can be especially hard if a staff member does not have experience in a field where a uniform must be perfect. (Note: just because someone was a police officer or in the armed forces it does necessarily mean they know, or remember, how to square away a uniform) This post will reveal some of the most common tricks of the trade that can be applied to Pathfinder Uniforms. It takes time to get good at all of it but it is worth the effort.
Ironing is Your Friend:
Never underestimate the impact of freshly ironed clothes. The most effective (and often overlooked) trick for having a good looking uniform is to iron it every time you intend to wear it.
Learn proper ironing technique
These are not the skills you learned in home economics. These are above and beyond. You may know how to iron a collared, button up shirt... but ironing a dress uniform shirt is a different beast. Be patient at first, it will take many attempts to learn how to iron a straight crease but it will be worth it. Don't be discouraged if you have to redo something 3,4, even 5 times.
Shirt:
Learn how to iron military creases. It takes some practice but will get much easier with time. Or you can buy a dress shirt that has permanent military creases. Tailors can also sew military creases into shirts. Put a little extra work into your sleeves. Make that outside crease sharp and straight. Put a bit of a fold on the patches on your sleeve. It will be difficult but get a little in there.
Pants:
Take your time. Pants may seem simple but need to look good too. To get your proper creases, hold the end of the pant leg and align the cuffs then start from the bottom and work your way up. Laying both legs on top of each other to check consistency. You have two legs and they need to be identical. The front seam should end about 6 inches below the waist. The rear crease should end no higher than the crotch of the pants.
Accessories:
Don't forget your other accessories! The scarf is the big one here but don't forget to occasionally press your tie, gloves, and undershirt. Even socks if yours wrinkle after being washed.
Starch:
Get some high strength starch and learn how to use it! Starch will help keep your uniform looking good in between wear and even help prevent things from looking off while you are wearing it. Starch your shirt, pants, scarf, and tie. Put heavier starch on the lower portion of your trousers to keep that cuff looking crisp. Make sure you starch your shirt on the large portions of fabric that will lay flat. Use some starch on the arms to keep that crease sharp and to help keep the fold in your badges there. Don't go overboard.
The scarf should be starched so that the bottom point lays flat and it will greatly help with your wearing technique.
Shirt Garter:
There are some nifty little devices that help you always keep the tucked in look. It's great to put on trousers and your waist looks perfect but it's gone the instant you sit or bend, or even move for that matter. Shirt straps, shirt garters, or shirt stays are essentially reverse suspenders for your shirt. they attach to the bottom of your shirt and then either around your foot or to the top of your socks. They are made of elastic and when tightened properly, will give a good tug to keep your shirt looking perfectly tucked in at all times no matter how much movement you do. A little hike and shift in the waist of your trousers and your shirt will look great again.
There are also rubber belts designed to be worn around the shirt and just under the waist of the pants. They also are deigned to keep a shirt tucked and trousers in place. They are great for primarily standing or walking and go on much easier with the help of a partner but are not effective for any other motion.
Use a Tailor:
Past ironing, a good tailor can make all the difference. Get your trousers and shirt tailored, and tell them it needs to be a military tailor and not a dress tailor. A military tailor will be just a little tighter on the shirt. Have them take any extra fabric out of the sleeves so they are not baggy. You want pants to ride just above the hipbone and when wearing shoes, you want a slight break in the bottom of the trousers. Always take your shoes when getting fitted. Have the tailor angle the trouser bottoms as well.
Buying Parts of the Uniform:
Pants: You probably got your dress shirt from AdvenSource but where to get the rest? True, you can buy pants from AdventSource but you will get a much better fit if you buy them elsewhere. Go to a store that has a good selection of dress pants for comparison. Take your shoes and try them on. Make sure that you actually get black and not something too light. Believe it or not there are about as many shades of black as there are colors in the rainbow and it can be next to impossible to tell the difference if they are not side by side. Trousers should fit well but don't have to be perfect.... you have a tailor for that remember? The most important thing is that the waist is not too snug and that the pant legs fit well with not too much extra fabric around the thighs. Your trousers should have a slimming look from the waist down. Never, ever, not in a million years, should you buy pleated pants! They may be great for certain suits and 1930's gangsters but they are an abomination with regard to uniforms.
Socks: Get a nice pair of dark black socks (not dark navy as is often the embarrassing case). Don't buy really thin or short ones either. The extra padding of a thicker sock will help cushion your feet and be more durable.
Shoes: You have quite a bit of leeway in this department. Until AdventSource decides to stock Corframs, you gotta buy shoes elsewhere. Three rules: They must be black, the must be lace up, and they must be shine-able (Ladies, you can wear other shoes as authorized by your club but the heel should not be larger than 2 inches). Put some effort into making sure they have a nice smooth, glossy look every time you wear the uniform (this means getting shoe polish, sitting down with a soft cloth and getting to work). Just like good headgear seals the deal at the top, good looking shoes seal it at the bottom.
Below are some additional tips.
- Use sewing scissors to trim off all little strings and pieces of thread that end up sticking out on your uniform.
- Hang up your uniform! Your uniform should always be in one of two places: On your body or on a hanger. When you must travel, use a garment bag, dry cleaning bag, or a garbage bag with a hole to keep your uniform protected.
- A lighter flame can be used to singe off the fuzz that can appear on patches and seams.
- A piece of chipboard cut into an oval and placed under your shirt behind you ribbons will help maintain a smooth appearance. Always check to make sure it can't be seen.
- Maintain excellent hygiene. Always "tune up" your appearance the morning of. Guys: there is no excuse for a day old beard.
- Use a permanent marker to patch up scuffs on the soles of your shoes.
- Replace items that are worn out. (ribbons or light colored pieces are frequent casualties)
- Always include a gig line trim as one of your last dressing steps.
- Dress in this order: undergarments, shirt (and button it leaving the top button undone), shirt straps or tailor belt, socks, trousers, shoes, belt, tie, sash (if putting on at that time), scarf, headgear and gloves.
- Adjust your belt buckle so that when worn, the right edge of the buckle is on your gig line and the metal tip at the other end of the belt rests under the first belt loop to the left side of the buckle. Trim any extra belt off so it does not extend farther than the back of the buckle. Keep that end neat and free of fraying. If using club belts, Pathfinders may thread extra belt past the buckle and underneath the rest of the belt in order to not have to cut every belt.
- Dress shoes don't have to be expensive to work great. Browse thrift stores to find a good deal. In my time as a Pathfinder staff, I have bought all but one pair at a thrift store.
- Make sure you get black socks and not dark navy. That is one of the first things I look for in a uniform inspection.
- Know how to tuck a tie in a crisp and military fashion. (In the shirt, not in the pants)
- Know the military tuck if your shirt does not fit perfectly.
- Use a half Windsor knot for your tie. Windsor and Pratt are also acceptable. The Four-in-hand, Simple, and Balthus knots should be avoided.
- Always check over your uniform for things that may need replacing. It's a good idea to have a spare belt, scarf, tie, socks, and ribbons.
- Keep your hands out of your pockets unless you are placing or retrieving something. And then, do not put anything in your pockets that will bulge.
- Always use a garment bag. Never fold your shirt or pants unless you absolutely have to. If you must fold, look into techniques on how to fold with minimal wrinkles and unwanted creases.
- Use antiperspirant instead of simple deodorant to prevent pit stains.
- For shirt pocket flaps, sew the button hole shut and sew the button onto the flap. Then attach small pieces of Velcro to the corners of the flap so that the corners stick down and don't roll up.
- Do not roll your sleeves. They make short sleeved shirts for that. If you are hot, you suck it up.
- Wear headgear properly.
- Do not add unneeded things to your uniform.
- When wearing a jacket, wear one that is clean and looks like it belongs in a professional setting. A sweat shirt, ratty snow jacket, or blanket is not appropriate. If the jacket is on, it will be at least 3/4 zipped up. if you are too hot that way, you don't need a jacket.
- Never wear undergarments that can be seen. This applies especially to long sleeve shirts worn under short sleeve dress uniforms. Wear a jacket or suck it up.
- Shine, or at least clean and buff, anything that has a metallic finish.
- Roll your scarf so that you have a tube that rests around your collar. Not only does it look better after the slide is on, but it helps keep the lines straight on the back of your neck.
- Apply military standards of dress and grooming whenever possible regarding hair, makeup and jewelry (but you already knew that, right?).
- Take your time dressing. Allow adequate time to get dressed so you can apply the proper attention. Putting a uniform on in a pup tent at a camporee is time consuming and takes patience but it can be done.
Have a squared away uniform even if you are camping (it can be done). Consistency is the key. Take the time to do it right and it will be noticed. No one cares if you look good after you were able to sleep in, get dressed at home and show up to a club meeting. What will stand out is that same uniform when you have it on Saturday morning at a camporee with bad weather, a six hour drive to get there, and having to get up at the crack of dawn with no indoor plumbing.
 |
| A visual of the gig line. Ignore the nasty belt flap |
 |
| Simple military tuck. Look up videos for better instruction |
Berets: The How To Guide
Many Pathfinders wear berets. Many Pathfinders fail miserably at wearing a beret. That's not to say that they have it all wrong, it's just not a form that (I feel) is fitting to the Pathfinder uniform. It's time we caught up. This will be a guide to getting, preparing, and wearing the black beret as part of the dress uniform.
First things first, it must be black. Not navy, red, green, purple, or any other color that happens to strike your fancy. Black is the appropriate color for the current Pathfinder uniform and it should stay that way. Not to say you can never designate other colors for things such as drill teams, drum corps, etc. (however, beware of any rules regarding what allowance is prescribed by your local conference)
So you don't have one and need to get one. Where do you go? You can buy berets from AdventSource. Their product is good but is the reason so many are worn improperly. Better sources are military uniform supply companies such as Parade Store. There is one type of beret you should get: military style, with badge stay, no pip, no lining, made of wool, and has an adjustable leather band. Anything else will probably have you looking better in a striped shirt, suspenders, face painted white and attempting to get out of a glass box.
Why so picky? All these properties have something to do with getting the look just right. Step one is preparation and forming the beret.
Preparation:
Forming:

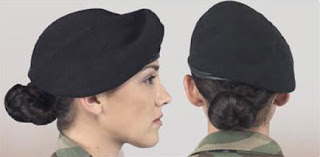 These two photos represent the proper way a beret should look.
First things first, it must be black. Not navy, red, green, purple, or any other color that happens to strike your fancy. Black is the appropriate color for the current Pathfinder uniform and it should stay that way. Not to say you can never designate other colors for things such as drill teams, drum corps, etc. (however, beware of any rules regarding what allowance is prescribed by your local conference)
So you don't have one and need to get one. Where do you go? You can buy berets from AdventSource. Their product is good but is the reason so many are worn improperly. Better sources are military uniform supply companies such as Parade Store. There is one type of beret you should get: military style, with badge stay, no pip, no lining, made of wool, and has an adjustable leather band. Anything else will probably have you looking better in a striped shirt, suspenders, face painted white and attempting to get out of a glass box.
Why so picky? All these properties have something to do with getting the look just right. Step one is preparation and forming the beret.
Preparation:
- If the beret you happen to have has lining or a pip on top.... cut it off. You don't need them and they will cause problems down the road if you don't.
- Inspect for flaws. If the beret happens to be owned by a club, then it's possible there could be stains, or damage that preclude it from being used. Make sure it will fit your head. (some berets are sized and others are not. The more accurate the sizing, the better the fit)
- If it does not have a badge stay (the stiff fabric covered cardboard piece inside the beret and sewn to the rim), it's not the end of the world. You'll just have to make one.
- Shave the beret. You heard me. Get a disposable razor and run it over the inside and outside of the beret. This will remove all the little "fluff" left over from manufacturing. Don't go crazy. Just smooth out the appearance. Start with the inside so you can get a feel for how it's done. Use sewing scissors to trim around the headband. Take you time and do it right.
- Attach the flash (also known as the beret patch). Make sure it's the beret patch and not a uniform patch. Position it on the outside of the beret where the badge stay makes a flat spot when pressed from the inside. Sew it in place. Don't glue it! Never glue it. The wool fabric does not handle glue very well and even if you can get away with it on your uniform, it's a very bad idea for the beret. Make sure it's straight and aligned with the headband. If you don't have a badge stay, see below.
- If you don't have a badge stay: Time to make one. Find some stiff cardboard. Corrugated cardboard will work but will wear out fast. I recommend some type of chipboard if you can find it and the thicker the better. 1/8" is ideal. If all you can find is corrugated, then take two pieces and glue them together to make a stronger piece. Cut the cardboard in almost the exact shape as the conference patch on your uniform. Then tack it in place behind your already sewn on flash with a couple of dabs of glue. Super Glue or similar works well.
- Consider carefully wrapping it in duct tape before installing. The tape will help strengthen not only the stay itself but your attachment to the lining and help protect from sweat.
Forming:
- Put it on your head with the headband level across the forehead and 1 in above the eyebrows. Pull the rest of the band around the head so it sit's in a horizontal line all the way around the head. If needed, it is acceptable to have a bit of a rise in back. Pull the sizing ribbon snug and tie it off. You may cut off the extra ribbon or plan on tucking it up when you wear it. The beret is sized properly and ready for forming.
- Use warm water to thoroughly dampen the fabric. Soak it evenly but try to leave the badge stay fairly dry for now. Do not use hot water no matter how tempting it sounds given the next steps. It will shrink your beret fabric and make it unusable.
- Stand in front of a mirror and put the beret on. It's even more helpful if you have a partner to assist. After you position the headband properly, hold the flash with the badge stay behind it straight up and down over your left eyebrow. Curl the ends of your fingers over the top of the stay to roll the fabric down behind the stay about a half inch. At the same time, with your right hand, pull the extra fabric down over your right ear. The fabric should at least reach the top of your ear and go no farther than the middle of your ear. Flatten the fold down and tug it in place to ensure all extra fabric is pulled over. The rest of the beret should be generally molded round your head. Manipulate the beret in this fashion over and over. It takes time, be patient. Re-wetting with warm water if needed. Continue until you have the proper look and the headband is still where it should be.
- Wear the beret like that until it dries. Or at least until it is relatively dry. It can then be taken off and carefully placed on a surface with the fold hanging off and left to dry the rest of the way. You could even ball up some paper to help keep the shape. There is no substitute for drying on the head though. Periodically, ensure the look is still proper. Obviously, this is best done when the weather is warm.
- Repeat the forming process if needed to get the right look. Each iteration of forming will correct flaws not fixed by the previous form.
Storage and Cleaning:
Always store the beret in a cool and dry place. Colors can fade if left for extended time in direct sunlight. When you are not wearing the beret, it is best to let it maintain it's shape. The most practical would be to fold the parts down so the beret is relatively flat. The beret can also be rolled and temporarily stored in a pocket or other part of the uniform. The beret may need to be reformed from time to time if it looses it's shape.
You can gently clean a beret with steam. Wipe the headband with a damp cloth and a gentle cleaner if needed. Beyond that, I recommend having berets professionally dry cleaned on a periodic basis. Trying something more than what is described above could destroy it.
You can gently clean a beret with steam. Wipe the headband with a damp cloth and a gentle cleaner if needed. Beyond that, I recommend having berets professionally dry cleaned on a periodic basis. Trying something more than what is described above could destroy it.
Proper Wear:
As described above, the proper wear of the beret is as follows:
- Headband horizontal across the forehead and 1 in above the eyebrows.
- The patch or flash should be positioned above the left eye
- The extra fabric is pulled down the side of the head, centered on and over the right ear. Fabric should extend to at least the top of the ear and no farther than half way down the ear.
- The rest of the band should be as horizontal as possible as it sits on the head. It is acceptable for the headband to present a raise at the back of the head.
- Sizing ribbons should be trimmed or tucked up under the beret.
- Hair should not extend below the edge of the beret in the front - tuck longer hair up and away.
- The beret is not worn indoors unless outdoor rules are in effect or while serving as a member of a Color or Honor Guard. The beret is never worn in a sanctuary.


Headgear
Headgear is one of the more diverse accessories utilized withing Pathfinder Clubs. Even from Conference to Conference, there seems to be little standardization as to what and how to wear headgear.... or if headgear is even used at all. This is intended to be an overview of headgear utilized in Pathfindering in the North American Division and will primarily focus on the United States.
Types of Headgear:
The Beret:
The black beret is commonly the officially authorized headgear for Pathfinders. The regulations go no further than to specify a beret and that is should be black in color. No mention of type of beret, style of wear, or rules for wear.
I have seen just about every variation of the beret used for a Pathfinder uniform and unfortunately, most of these accompany a dress uniform. From the crisp and well formed black beret of the military style accompanying an equally crisp and military uniform to the awkwardly colored international styles, worn in no particular manner and a uniform of similar character.
While I favor the use of the beret in Pathfinders, it must be
worn in a manner that reflects the spirit of Pathfindering. It should be crisp, clean, properly formed, fitted, and worn properly with the uniform. Just like US military applications, deviance from the specified black, should be reserved for distinguished groups and authorized by the local Conference.
If you are wearing berets, please keep them within the tradition of the uniform. They are not a flashy accessory but just as important a piece as the blouse itself.
The Ball Cap:
While a great addition to a hike or picnic, it has no place on a dress uniform. It would be as inappropriate as wearing white tennis shoes with the dress uniform.
Garrison Cap:
While not used by many NAD Pathfinders, it has it's heritage in the JMV clubs as the headgear of choice. The issue with garrison caps and the current NAD Dress Uniform is that colors are hard to come by. The cap would need to be either black or tan. Then the beret flash (the only insignia authorized for headgear) would not fit or attach properly. It's mostly a nostalgic piece... and a good one at that. It reminds us of our roots and the social conventions that were in place when Pathfinders started. Perhaps the NAD should look into bringing it back.
Service Cap:
Also known as a Combination Cover, Peaked Cap, Wheel Cap, Saucer Cap, or Barracks Cover; I have seen a few service caps utilized with a pathfinder uniform. Most of the time they are left over from prior military service and look appropriate with the Master Guide Uniform. Others appear to have been gotten at a Halloween clearance sale or from a defunct military government. This cap has a lot of potential but can be hard to care for properly in addition to the expense of good quality. I also include the 8-point hat in the category even though it is technically different.
Utility Cover or Patrol Cap:
This covers a range of cover, caps, or hats worn by various branches of the United States Military as part of the Battle Dress Uniform. This has spawned a set of headgear that is of the same style and usually solid in color. Pathfinder have also been seen wearing this type of headgear in uniform. A black utility cover does not look totally out of place but tops off the Pathfinder with one step down from dress uniform. My recommendation for those wanting to use this headgear would be to utilize it with a different uniform such as a specific drill team or drum corps outfit where it more appropriately matches.
Campaign Cover:
Few Pathfinders wear the campaign cover and those that do are almost certainly staff. The reason for wearing is varied. It has several uses in the United States: Forrest Service personnel wear a version of the hat and is most recognized as the hat worn by Smokey the Bear... hence the slang term "smokey bear hat" or simply "smokey". Several State Patrols use the campaign hat as their uniform hat. Then there is the use by drill instructors, drill sergeants, and training instructors in the US Military. Most often, any campaign hat of the military or state trooper style is worn in a military fashion. The Forrest Service version is generally worn in a more laissez-faire style and not appropriate for the dress uniform. Because of the authority and image the cover represents, it is the most appropriate choice for Pathfinder Drill Instructors. Both a black and green cover would be acceptable providing it matched the color of the uniform being worn.
Cowboy Hat:
Unless you are from Texas, you have no business wearing a cowboy hat anywhere near a Pathfinder Dress Uniform. Humor with a grain of truth here for sure. Plain and simple, the cowboy hat is not a uniform hat. While it may embody a person's or group's personal beliefs, it's not generally appropriate for wear in dress uniform. If you must, try to keep it to a special group such as a drum corps. And, no matter how much you may identify with cowboys, it's probably not the best choice for a club from New York. it just doesn't fit. Keep it classy.
Anything Else:
Don't.
I have seen just about everything topping off a Pathfinder in dress uniform. From the headgear worn well and tastefully to the furry neon green, Cat-in-the-Hat top-hat sold at the fair. We have a uniform for a reason, and it does a great dishonor to the spirit of the uniform to add something that is not appropriate. In the same way that clubs would not allow Pathfinders to wear their sneakers or flip flops with a dress uniform, they should not allow headgear that accomplishes the same. If you are going to wear a hat with your uniform. Please make sure that it looks appropriate. Keep it uniform (that means everyone wears the same thing). Wear it with pride.
Types of Headgear:
The Beret:
The black beret is commonly the officially authorized headgear for Pathfinders. The regulations go no further than to specify a beret and that is should be black in color. No mention of type of beret, style of wear, or rules for wear.
 |
Col. Clarke wearing the tan Army Ranger beret
in the appropriate military fashion.
|
 |
"French" beret worn "goofy". Often
accompanied by goofy uniforms and an apparent abhorrence
to tucked shirts or ironing.
|
If you are wearing berets, please keep them within the tradition of the uniform. They are not a flashy accessory but just as important a piece as the blouse itself.
The Ball Cap:
While a great addition to a hike or picnic, it has no place on a dress uniform. It would be as inappropriate as wearing white tennis shoes with the dress uniform.
Garrison Cap:
While not used by many NAD Pathfinders, it has it's heritage in the JMV clubs as the headgear of choice. The issue with garrison caps and the current NAD Dress Uniform is that colors are hard to come by. The cap would need to be either black or tan. Then the beret flash (the only insignia authorized for headgear) would not fit or attach properly. It's mostly a nostalgic piece... and a good one at that. It reminds us of our roots and the social conventions that were in place when Pathfinders started. Perhaps the NAD should look into bringing it back.
Service Cap:
Also known as a Combination Cover, Peaked Cap, Wheel Cap, Saucer Cap, or Barracks Cover; I have seen a few service caps utilized with a pathfinder uniform. Most of the time they are left over from prior military service and look appropriate with the Master Guide Uniform. Others appear to have been gotten at a Halloween clearance sale or from a defunct military government. This cap has a lot of potential but can be hard to care for properly in addition to the expense of good quality. I also include the 8-point hat in the category even though it is technically different.
Utility Cover or Patrol Cap:
This covers a range of cover, caps, or hats worn by various branches of the United States Military as part of the Battle Dress Uniform. This has spawned a set of headgear that is of the same style and usually solid in color. Pathfinder have also been seen wearing this type of headgear in uniform. A black utility cover does not look totally out of place but tops off the Pathfinder with one step down from dress uniform. My recommendation for those wanting to use this headgear would be to utilize it with a different uniform such as a specific drill team or drum corps outfit where it more appropriately matches.
Campaign Cover:
Few Pathfinders wear the campaign cover and those that do are almost certainly staff. The reason for wearing is varied. It has several uses in the United States: Forrest Service personnel wear a version of the hat and is most recognized as the hat worn by Smokey the Bear... hence the slang term "smokey bear hat" or simply "smokey". Several State Patrols use the campaign hat as their uniform hat. Then there is the use by drill instructors, drill sergeants, and training instructors in the US Military. Most often, any campaign hat of the military or state trooper style is worn in a military fashion. The Forrest Service version is generally worn in a more laissez-faire style and not appropriate for the dress uniform. Because of the authority and image the cover represents, it is the most appropriate choice for Pathfinder Drill Instructors. Both a black and green cover would be acceptable providing it matched the color of the uniform being worn.
Cowboy Hat:
Unless you are from Texas, you have no business wearing a cowboy hat anywhere near a Pathfinder Dress Uniform. Humor with a grain of truth here for sure. Plain and simple, the cowboy hat is not a uniform hat. While it may embody a person's or group's personal beliefs, it's not generally appropriate for wear in dress uniform. If you must, try to keep it to a special group such as a drum corps. And, no matter how much you may identify with cowboys, it's probably not the best choice for a club from New York. it just doesn't fit. Keep it classy.
Anything Else:
Don't.
I have seen just about everything topping off a Pathfinder in dress uniform. From the headgear worn well and tastefully to the furry neon green, Cat-in-the-Hat top-hat sold at the fair. We have a uniform for a reason, and it does a great dishonor to the spirit of the uniform to add something that is not appropriate. In the same way that clubs would not allow Pathfinders to wear their sneakers or flip flops with a dress uniform, they should not allow headgear that accomplishes the same. If you are going to wear a hat with your uniform. Please make sure that it looks appropriate. Keep it uniform (that means everyone wears the same thing). Wear it with pride.
Subscribe to:
Posts (Atom)